Hi , it is been a while since I posted in our blog . In this article we will talk about Load balancing CAS Servers in Exchange 2010 using Cisco ACE 4710. So let’s get started.
First we will need to talk about some terminologies and concepts.
Stickiness:
Also Called Persistence or Affinity , it is the ability to “Stick” the connection to the same Real Server for the client, for example imagine a web site for banking or e-Trading the requests from the Client has to go to the same Real Server until the client disconnects or ends the session.
Sticky Types
The ACE appliance supports stickiness based on:
• HTTP cookies
Client cookies uniquely identify clients to the ACE and the servers providing content. A cookie is a small data structure within the HTTP header that is used by a server to deliver data to a Web client and request that the client between the client and the server.
When the ACE examines a request for content and determines through policy matching that the content is sticky, it examines any cookie or URL present in the content request. The ACE uses the information in the cookie or URL to direct the content request to the appropriate server.
The ACE supports the following types of cookie stickiness:
• Dynamic cookie learning
You can configure the ACE to look for a specific cookie name and automatically learn its value either from the client request HTTP header or from the server Set-Cookie message in the server response. Dynamic cookie learning is useful when dealing with applications that store more than just the session ID or user ID within the same cookie. Only very specific bytes of the cookie value are relevant to stickiness.
By default, the ACE learns the entire cookie value. You can optionally specify an offset and length to instruct the ACE to learn only a portion of the cookie value.
Alternatively, you can specify a secondary cookie value that appears in the URL string in the HTTP request. This option instructs the ACE to search for (and eventually learn or stick to) the cookie information as part of the URL. URL learning is useful with applications that insert cookie information as part of the HTTP URL. In some cases, you can use this feature to work around clients that reject cookies.
• Cookie insert
The ACE inserts the cookie on behalf of the server upon the return request, so that the ACE can perform cookie stickiness even when the servers are not configured to set cookies. The cookie contains information that the ACE uses to ensure persistence to a specific real server.
• HTTP headers
You can use HTTP-header information to provide stickiness. With HTTP header stickiness, you can specify a header offset to provide stickiness based on a unique portion of the HTTP header
• IP addresses
You can use the source IP address, the destination IP address, or both to uniquely identify individual clients and their requests for stickiness purposes based on their IP netmask. However, if an enterprise or a service provider uses a megaproxy to establish client connections to the Internet, the source IP address no longer is a reliable indicator of the true source of the request. In this case, you can use cookies or one of the other sticky methods to ensure session persistence.
• HTTP content
allows you to stick a client to a server based on the content of an HTTP packet. You can specify a beginning pattern and ending pattern, the number of bytes to parse, and an offset that specifies how many bytes to ignore from the beginning of the data
• Layer 4 payloads
Layer 4 payload stickiness allows you to stick a client to a server based on the data in Layer 4 frames. You can specify a beginning pattern and ending pattern, the number of bytes to parse, and an offset that specifies how many bytes to ignore from the beginning of the data.
• RADIUS attributes
RADIUS stickiness can be based on the following RADIUS attributes:
•Calling station ID
•Username
• RTSP headers
RTSP stickiness is based on information in the RTSP session header. With RTSP header stickiness, you can specify a header offset to provide stickiness based on a unique portion of the RTSP header.
*Real Time Streaming Protocol (RTSP) is a network control protocol designed for use in entertainment and communications systems to control streaming media servers. The protocol is used to establish and control media sessions between end points.
• SIP headers
SIP header stickiness is based on the SIP Call-ID header field. SIP header stickiness requires the entire SIP header, so you cannot specify an offset.
*Session Initiation Protocol (SIP) is a signaling protocol, widely used for controlling multimedia communication sessions such as voice and video calls over Internet Protocol (IP).
Access the ACE CLI using HyperTerminal for Windows by following these steps:
1. Launch HyperTerminal.
2. Enter a name for your connection in the Name field.
3. Click OK.
4. From the Connect using drop-down list, choose the COM
port to which the device is connected.
5. Click OK.
6. Set the port properties:
Bits per second = 9600
Data bits = 8
Parity = none
Stop bits = 1
Flow control = None
7. Click OK to connect.
1.At the login prompt, log into the ACE by entering the login username admin and password. By default, the username and password are admin. For example, enter:
Starting sysmgr processes.. Please wait…Done!!!
switch login: admin
Password: admin
2. At the Enter the new password for “admin”: prompt, change the default Admin password. If you do not change the default Admin password, after you upgrade the ACE software you will only be able to log in to the ACE through the console port.
Enter the new password for “admin”: xxxxx
Confirm the new password for “admin”: xxxxx
admin user password successfully changed.
3. At the Enter the new password for “www”: prompt, change the default www user password. If you do change the default www user password, the www user will be disabled and you will not be able to use Extensible Markup Language (XML) to remotely configure an ACE until you change the default www user password.
Enter the new password for “www”: xxxxx
Confirm the new password for “www”: xxxxx
www user password successfully changed.
Caution At this point, you should consider whether you plan to configure the ACE using the Device Manager GUI or using the CLI. If you have a trunking network setup, or if your VLAN 1000 has been used, you should bypass the following setup script and use the CLI
4. At the “Would you like to enter the basic configuration dialog? (yes/no)” prompt, press Enter to continue the setup. To bypass setup and directly access the CLI, type no.
Would you like to enter the basic configuration dialog? (yes/no) [y]:
Note The ACE provides a default response in brackets [ ] for each question in the setup script. Accept the default response to a configuration prompt by pressing Enter.
5. Select port 1 to carry management VLAN communication by pressing Enter.
Enter the Ethernet port number to be used as the management port (1-4):? [1]:
6. Assign an IP address for the management VLAN interface by entering 172.25.91.110.
Enter the management port IP Address (n.n.n.n): [192.168.1.10]: 172.25.91.110
7. Accept the default subnet mask for the management VLAN interface by pressing Enter.
Enter the management port Netmask(n.n.n.n): [255.255.255.0]:
8. Assign the IP address of the gateway router (the next-hop address for this route) by entering 172.25.91.1.
Enter the default route next hop IP Address (n.n.n.n) or <enter> to skip this step: 172.25.91.1
9. Examine the entered values.
Summary of entered values:
Management Port: 1
Ip address 172.25.91.110
Netmask: 255.255.255.0
Default Route: 172.25.91.1
10. Review the configuration details by pressing d.
Submit the configuration including security settings to the ACE Appliance? (yes/no/details): [y]:
interface gigabitEthernet 1/3
switchport access vlan 1000
no shut
access-list ALL extended permit ip any any
class-map type management
match-any remote_access
match protocol xml-https any
match protocol dm-telnet any
match protocol icmp any
match protocol telnet any
match protocol ssh any
match protocol http any
match protocol https any
match protocol snmp any
policy-map type management first-match remote_mgmt_allow_policy
class remote_access
permit
interface vlan 1000
ip address 172.25.91.110 255.255.255.0
access-group input ALL
service-policy input remote_mgmt_allow_policy
no shutdown
ssh key rsa
ip route 0.0.0.0 0.0.0.0 172.25.91.1
11. Accept this configuration by pressing Enter; otherwise, press n.
Submit the configuration including security settings to the ACE Appliance? (yes/no/details): [y]:
12. After you select y, the following message appears.
Configuration successfully applied. You can now manage this ACE Appliance by entering the url ‘https://172.25.91.110′ into a web browser to access the Device Manager GUI.
After you have completed the setup script, the command prompt appears.
switch/Admin#
After you specify a Gigabit Ethernet port, port mode, and management VLAN, the setup script automatically applies the following default configuration:
- A Management VLAN is allocated to the specified Ethernet port.
- An extended IP access list that allows IP traffic originating from any other host addresses.
- A traffic classification is created for management protocols HTTP, HTTPS, ICMP, SSH, Telnet, and XML-HTTPS. HTTPS is dedicated to connectivity with the Device Manager GUI.
- A VLAN interface is configured on the ACE.
Assigning a Name to the ACE
The hostname is used for the command-line prompts and default configuration filenames. When you establish sessions to multiple devices, the hostname helps you keep track of which ACE you are entering commands to. By default, the hostname for the ACE is switch.
For example, change the hostname of the ACE from switch to host1 by entering:
switch/Admin# Config
switch/Admin(config)# hostname host1
The prompt appears with the new hostname.
host1/Admin(config)#
Logging in to the ACE
You can access the ACE Device Manager GUI through a web-based interface. Log in to the Device Manager by following these steps:
1. Navigate to the ACE Device Manager by entering the secure HTTPS address or hostname of the ACE in the address field of a web browser. For the example setup shown earlier in Figure 1, enter:
https://172.25.91.110/
2. Click Yes at the prompt to accept (trust) and install the signed certificate from Cisco Systems, Inc. To avoid having to approve the signed certificate every time you log in to the Device Manager, accept the certificate.

- 3. In the User Name field, type admin for the admin user account.
- 4. In the Password field, type the new password that you entered
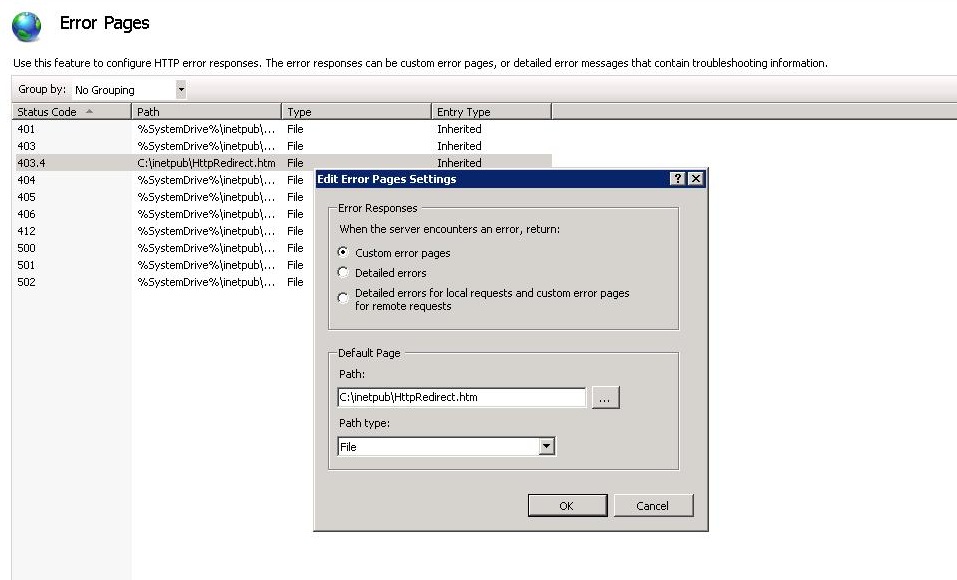
- 5. Click Login. The default window that appears is the Virtual Contexts window with the Admin context listed, as shown in Figure 7.
- Virtual Contexts Pane (Admin Context)
")
The “default” resource class works well for basic configurations that do not need sticky session persistence. For sticky session persistence, you need a resource class that allocates more than 0% of the “Sticky” resources. For each context in which you configure stickiness, you must do the following:
–Configure a resource class in the Admin context that you can associate with one or more contexts where you want to configure stickiness.
Creating a Resource Class
Create a resource class by following these steps:
1. Choose Config > Virtual Contexts > System > Resource Class.

Next we will start by configuring VLAN interfaces required for operation :
Create VLAN interface and give it an IP address , Netmask and enable it
Enable the Physical Interface and give it a name and assign it to a VLAN interface


Adding NAT Pools
Next create a NAT pool by clicking on the NAT pools link. you need a NAT pool as it provides a set of IP addresses that ACE can use as source addresses when sending requests to the real servers. The NAT pool must be configured on the same VLAN interface that you identified or created
For VLAN ID, specify the VLAN number from the VLAN Interfaces step. Use the NAT Pool ID set in the field or enter your own. Then enter the IP address range for the NAT pool using the Start IP Address and End IP Address or Netmask fields.
The NAT pool can be as small as single IP address and it can even re-use the virtual IP (VIP) you plan to use for the application. However, NAT pools with more IP addresses allow more concurrent requests to the real servers. ACE allows several thousand concurrent connections per NAT pool IP address, as long as port address translation (PAT) is enabled. With PAT disabled, ACE can only handle one connection per NAT pool IP address

This Concludes Part 1 , In Part 2 we will configure Virtual Server , Real Servers , Farms and Sticky Groups and SSL Proxy Service so stay tuned.


